Pages

Saturday 22 November 2014

Healthy KFC & The Most Easy and Perfect Homemade Spicy Wedges


So last wednesday in Brisbane there was CRAZY storms... flash flooding, deafening thunder, gail force winds and the works! I dont think I'll ever get used to this crazy tropical weather! I have always complained about how cold and miserable Ireland is but by god did I miss it on Wednesday!

I do love looking at the lightnening and hearing the thunder (even thought it makes me want to jump!!). Luckily I got home before the storm really set in! I would not like to have been driving on the roads in the downpour!

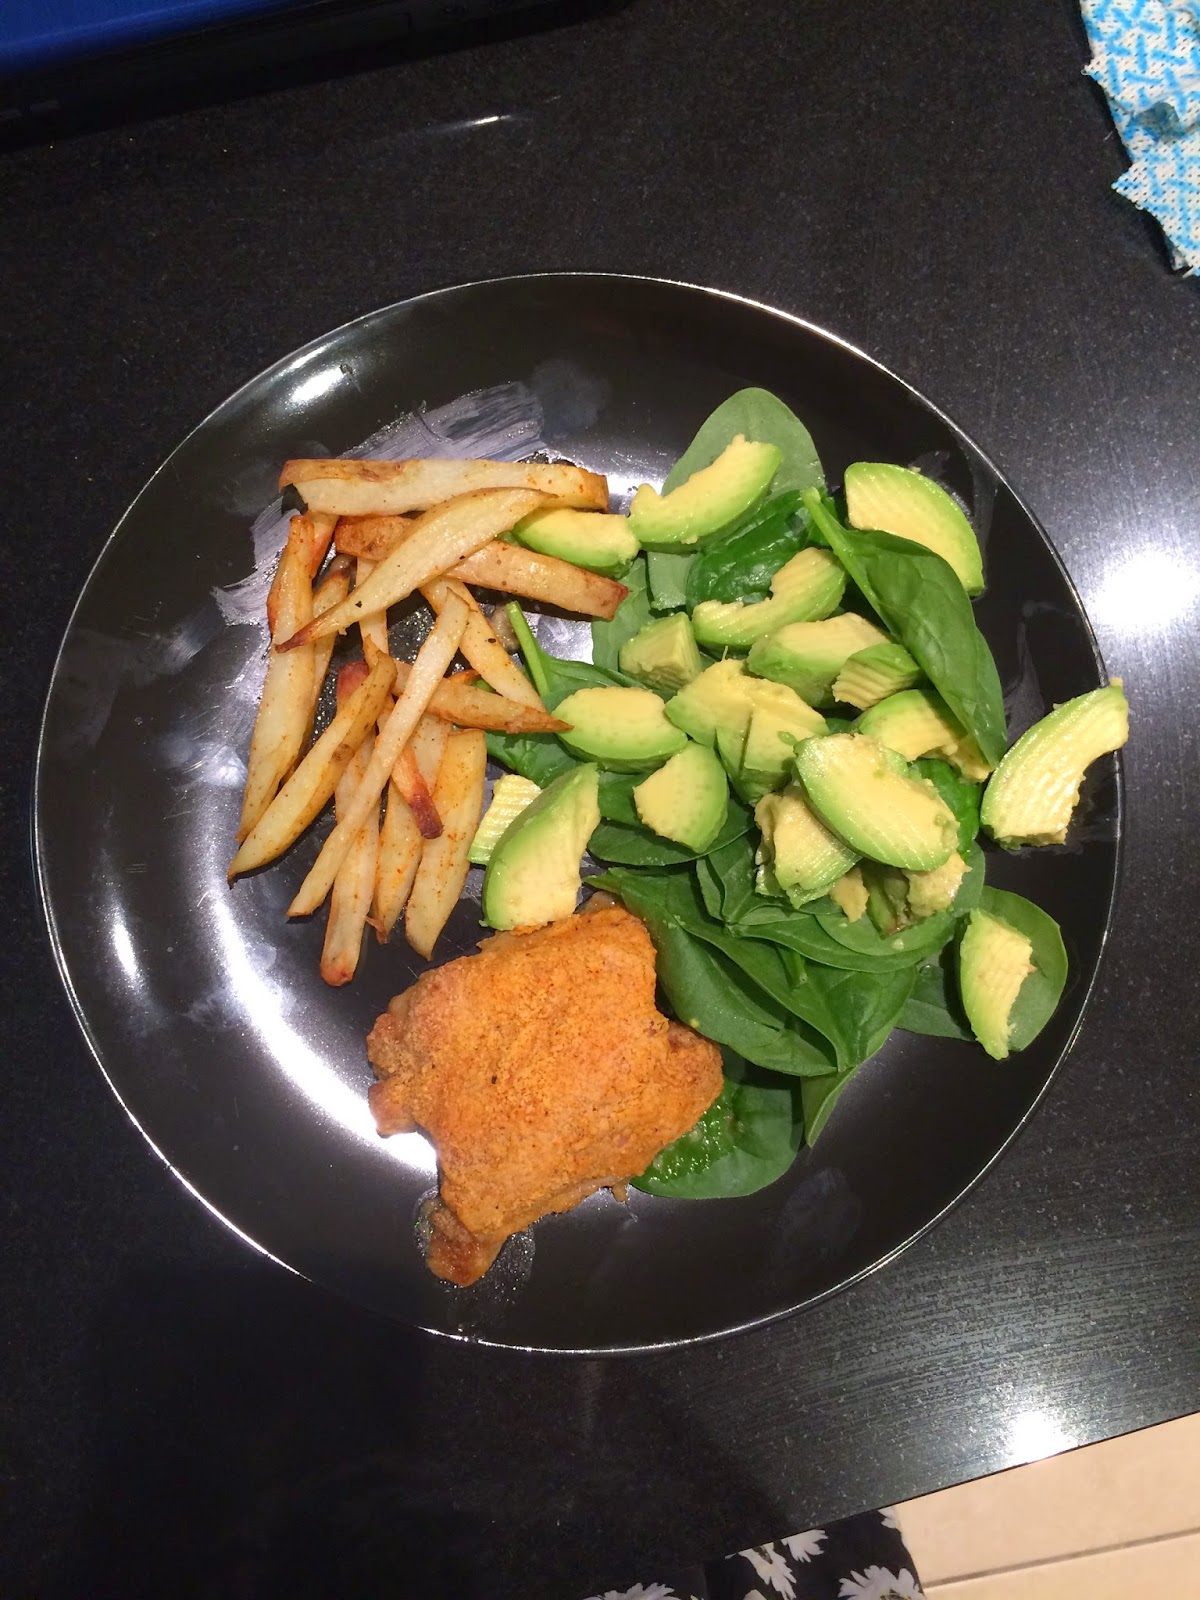
So as a result Wednesday evening was one for hibernation and not venturing outside. Spurred on by a craving for chicken & chips, I decided to make a healthy version instead of reaching for the mainstream bucket of grease (I used to have a real soft spot for hot wings until I got food poisoning from them!).

And so my heatlhy version of grain-free, gluten-free, dairy-free KFC was born!! This bad boy contains no processed crap or vegetable oils and are baked to give it that crispy coating. I have to share the recipe because I really think that this version is better than any processed junky version on the market! So without further ado here is the recipe, I hope ye enjoy it!

You will need:

For the chicken: (makes about 3 serves)
 
500grams of chicken thigh fillets (drumsticks or tenderloins would also work well depending on what you prefer)
1/2 cup of Almond flour
1 tbsp garlic powder
1 tbsp paprika (either smoked or sweet works well too)
1 tbsp 
1 tsp onion powder
1/2 tsp baking powder
1 tsp salt (I used himalayan pink)
1 tsp freshly ground black pepper
1 egg (optional)
(You could also add a couple tablespoons of sesame seeds for a bit of texture and extra crunch or some hot chilli powder for an extra kick)

Simply mix all dry ingredients in a bowl until combined


Then whisk the egg in a separate bowl and dip the chicken in the egg. This is optional and depends on how thick a batter coating you like on your chicken - I skipped this more accidentaly than anything because we had run out of eggs so I decided to chance it! I was nicely surprised as it produced a nice thin crispy coating.

Toss the chicken (either egg coated or plain) in the coating mix.


Shake off excess and place on a lined baking tray. You can spray the top of the chicken with some olive oil or coconut oil which adds some extra golden brown crunchiness.


Bake in the oven for 30-40 minutes at 200 degress celsius.


For the homemade spicy wedges:

3 large washed potatoes with skin on (I made enough to serve 3 people but you can use as many as you want)


All you have to do is cut them into strips. I like to cut them fairly skinny for extra crispyness - but you can cut them into thicker chunks. Just allow extra over time!

Place the cut potatoes into a collander and rinse well under cold water (this gets rid of any extra starch and allows then to crisp up nicely in the oven so dont forget this step!!)


Once well rinsed and drained - throw them out onto a clean dry tea towel or some kitchen towel and pat dry (another really important step so the outside crisp up so dont skip this either!!)


Then coat the wedges in a small amount of olive oil. Dont over do this as they may turn soggy if you put too much on. If you dont have spray olive-oil - then dont be afraid to sprinle a half tablespoon of olive oil from the bottle on and get your hands in there to rub the oil thinly and evenly on the wedges.

Toss seasoning of your choice on them before baking in the oven for about 40 minutes at 200 degrees celcius.

It works well to make these first before the chicken and bake them for 10 minutes before putting the chicken in so they are done at the same time.


 I like to toss mine in salt, pepper, smoked paprika and cayenne pepper (just a tiny bit!). But you could also try these combinations:

Garlic powder and dried rosemary
Parmesan cheese
Hot chilli powder
Peri peri seasoning
Mexican spice mix
 
Then take it all out the oven and inhale it! I had mine with a simple salad of avocado and fresh spinach. Yum yum! A healthy version of a cheat meal - guilt free goodness packed with healthy fats and protein.


The chicken holds pretty well in the fridge for a few days after and the flavour actually intensifies a little so they are a great quick and easy one for prep days! I would imagine you could freeze them but they would loose crispyness also. The wedges are best eaten fresh.

Enjoy!!


Mary

xxx

Saturday 8 November 2014

Workout Inspiration - Tighten up your legs and bum!

Today's workout inspiration is all about the lower body.

It's one of the most important areas to focus on if your looking to lose weight and tighten everything up.

I have a love/hate relationship with the infamous 'Leg Day' - I need to motivate myself to get stuck into those squats but when I do it's so worth it! There is something so rewarding about pushing yourself to your limit and then collapsing in an accomplished ball of sweat on the floor! I love it!

One of the main reason why I love working the gluts, hamstrings and quadriceps is because they are some of the largest muscle groups in the body... Why is this relevant? Lets get a bit more technical...

  • During exercise your muscles require a larger amount of oxygen than when you are at rest.
  • Your breathing rate goes up as your lungs try to increase the amount of oxygen you are taking in. 
  • In order to accomodate this, your cardiac output (blood-flow from your heart) increases allowing more oxygen-rich blood to travel to the muscles at work
  • The more intense the exercise that you do, the more your heart rate increases and the more calories you burn.
Therefore... in order to turn your body into a fat burning machine, it is more efficient to work your larger muscle groups before focusing on the smaller ones. This means more calories are burned and you get more out of your workouts instead of focusing on fiddly isolation exercises!

Combine this theory with resistance training then you have the secret to maximise fat burning! This is because of the afterburn that occurs. When you lift weights it causes your metabolism to increase and remain in a turbocharged state for up to 48 hours after training. During cardio based exercises you burn calories during and then stop when your heart-rate returns to normal. During resistance based interval training you burn calories during the session but due to the metabolism spike, your caloric burn continues for 2 days after you finish that session - amazing!

Whats even better again is that resistance training allows you to increase your body's lean muscle mass. Muscle is a little more high maintenance than fat tissue and requires a higher level of energy in order for it to maintain itself. This means that by increasing your lean muscle mass, overall your body burns a higher level of calories throughout your general non-active daily routines.

So lets get stuck into this ladies! Here is a lower body circuit workout that incorporates resistance  training using a combination of free weights and your own body weight.


Some tips to keeping good form in this are:

  • Remember to lower your bum down towards the floor with a flat back during the squat - stop when your thighs are parallel to the floor - remember to push your weight back onto your heels as you come back up!
  •  The walking lunges can be done weighted or unweighted.
  • If you are new to this exercise dont fret if you reach muscle failure before 30 seconds with weights, simply drop the weights and continue
  • Sumo burpees are  the same as normal burpees but lower yourself into a sumo squat position by taking your legs out as wide as possible to protect your knees and turn your toes outwards. (These bad boys are the secret to blasting your inner thighs!)

  • With all of these exercises the golden rule to injury prevention is to keep your knees on top of your toes. Dont let them track too far outwards over the toes as this puts too much pressure on the knee joint and can cause accelerated wear and tear - we want our knees for life remember!

This circuit is a timed one - instead of completeing a set number of repitions, I suggest trying to complete as many reps of each exercise within the time limit - this allows you to really get your heart rate up and push yourself as hard as possible for maximum metabolic burn.

Complete each exercise back to back - I recommend setting a timer on your phone so that the number-work is figured out for you! Repeat this circuit 3-4 times resting for 60 seconds in between each circuit - try to keep moving during the rest, walk around, drink some water - just dont lie there on the floor, after all we are here to WORK!!!

Also! Remember to choose a weight thats not too heavy given the high number of reps, but heavy enough to complete the full 60 seconds with good form - it is so important to maintain GOOD FORM! So if you get half way through and you start to fail dont just stop - drop the weights and keep going!

The overall goal is to reach muscle failure so that during the recovery phase after your workout - your body undergoes the changes needed in order for you to adapt to this training routine - so you get fitter, faster and stronger!

So lets get our sweat on!!


Mary

xxx


Tuesday 4 November 2014

My Version of a Paleo-ish Sweet Potato Pizza Recipe

I love pizza! It is such a great comfort food!

Unfortunately the standard take-away or frozen pizzas are made of refined grains and a huge amount of vegetable oils and trans-fats which are a bit of a no-no for those of us on a healthy whole food journey!

I generally try and stay away from all that rubbish and even though its nice every now and again to indulge (I still go for the gluten-free base though)- I refuse to believe that there isnt a tasty healthier unprocessed version out there! So I am on a quest for the perfect healthy pizza base!


NOTE!!!!!  before you jump to conclusions, this is NOT a post about the 'deliciousness' of cauliflower pizza which seems to be really in fashion at the minute.

Just about every second health nut is raving about how tasty the cauliflower substitute is - 'it tastes just like the bad stuff', 'you wouldnt even know its got cauliflower in it'.

Oh yea?

Well! I firmly believe that all those claims are giant LIES!!!

This is just my own personal opinion but I have tried a few cauliflower pizza recipes and each one has let me down! I have gotten my hopes up with every new version I see - whacked all the ingredients together for the base, baked it in the oven and then pulled it out with excitement only to find that when you cut into it, it doesnt hold its shape! You cant pick up a slice! Its too crumbly! And the taste isnt much better! It just tastes like cauliflower no matter what anyone says! And yes you can season it all you like with herbs, salt, cheese etc which overall improves the flavour but definately not the texture. If I cant eat my pizza by the slice - I'm sorry it just doesnt feel like pizza to me!!!

After about my 6th attempt at lieing to myself about how pizza-like this damn cauliflower thing was, I got tired and packed it in! And launched a new search to try and find something with a little more substance and texture, a mix that would hold a reasonable amount of toppings without falling all over the place!

Surely there is an answer!

I decided to try experimenting with grain free bases and tried blends of coconut flour and almond flour which was tasty but still too dry and crumbly (grrrrr.....).

So in the middle of my crazy google search, I stumbled across a pizza recipe on bodybuilding.com by the author of proteinpow - Anna Sward. A recipe based around sweet potato - yes sounds crazy I know, and at first  I was a bit sceptical, I love sweet potato but wasnt so convinced if its sweetness would go well with pizza sauce, cheese, chillis, salami etc. All in all I went against my doubts and tried it - I figured that anythings has to taste better than cauliflower! (again I love cauliflower AND even cauliflower fried rice! but it just doesnt work with pizza! END OF!).

Now I had to make my own adaptations to this recipe based on what I had in the press - it was friday night and I was too lazy to get in the car and go to the shops! So here is my version!:

  • Roughly 120g of cooked sweet potato (wrap it in tin foil & roast it first - or you could steam/boil etc)
  • 2 large organic eggs (the recipe calls for egg whites, but I cant stand waste! and eggs are so much better for you when you eat them whole - plus the extra healthy fats in the yoke add to the overall flavour of this recipe)
  • 1/4 Cup almond flour
  • 1 tbsp Coconut Flour
  • 1 tsp Chia seeds 
  • Salt, pepper, oregano/herbs to taste

Just throw all the ingredients into a bowl and whisk until combined. Spread onto a baking sheet (you have to spoon this mix onto the sheet as it is more like a batter than a dough - make sure to spread it thinly and evenly for best results - if you like it a bit thicker thats fine but be prepared to cook it in the over a little longer so the middle cooks properly). Then bake in a preheated oven at 180 degrees for 10-15 mins.

Keep an eye on the edges when they start to turn golden brown and crispy then its ready to take out. Then cover in toppings of whatever you fancy and bake again for another 10 minutes. Anna recommends brushing the edges with olive oil to add a little extra to the crust which I forgot to do because I was blindly hungry at this point and couldnt wait to eat it! So dont forget that step like me!


My chosen toppings were onions, red & green peppers, salami, pumpkin and some mozzarella and parmesan cheese. But pretty much anything should work (except pineapple - I just dont understand why you would want to put this on your pizza people!)

And the verdict?

I was nicely surprised with this one! I hadn't any high hopes for it to be super tasty but it didnt let me down at all! The base was tasty with a hint of sweet potato and I really liked the doughy texture. And the best thing was that when I cut it in slices and picked one up - it actually stayed in slice form and didnt just collapse! It definately gets at thumbs up from me! And will be a staple in my future friday nights! Processed junk free, trans-fat/veg oil free, gluten and grain free and still tastes good - perfect!


Now my versions calories are a quiet a bit higher than the PP recipe given the almond flour and eggs added to the mix instead of a grain flour and egg whites, but its packed full of healthy fats and protein so that wasnt something I stressed about - and minus the artificial fillers and overall rubbish! I personally believe it also only really serves one unless you are planning on making a couple of sides with it.

Give it a go and see if you like it!

The original link to Anna's recipe is here, if you'd prefer to try that one. She has also listed another clever little one made with vegan pea/brown rice protein powder which I have also tried before in the past and is a little more pan-cakey but works very well too!

Enjoy!! - also if anyone has found any amazeballs healthy pizza recipes that would make my life a better place please share!!


Mary

xxx


Wednesday 29 October 2014

Why I dont plan cheat meals anymore.

Hi everyone!

Happy Thursday! So this is a follow-up post to a picture that I posted this morning on my instagram profile that I want to go into a bit further. Yesterday was my boyfriend's birthday and his favourite dessert is lemon meringue pie, so I decided to make him a birthday pie instead of a cake (best girlfriend ever!). Now normally I like to try to pimp out my favourite desserts and treats by trying to find a healthier version of the same recipe or having a play myself and adapting the recipe (which usually involves quiet a few attempts before I get it right as well as some interesting looks from the victims I choose to taste each batch!) - with the usual aim to cut out all the refined processed carbohydrates and sugars.

Needless to say when I first told Pearce that I was going to make him lemon meringue for his birthday, he was skeptical and assumed that the version I was going to make was going to be a - shall we say - 'interesting' concoction of more healthy ingredients that may or may not taste similiar!. However! Given the day that was in it, I decided that it was worth making him the old-fashioned unhealthy sugar-loaded version (except without the gluten in the pie base - I gave up gluten due to some digestive issues but also as it really flares up my acne, I mean like not just face but chest, back AND armm... bye bye bread!).


So yes I made it, and yes I ate a piece, and yes it was amazing (I am really good at baking!) and most importantly no I felt no guilt whatsoever! I rarely eat unhealthy or overprocessed foods, its not even a choice for me anymore - I have been eating healthy for so long and have discovered some amazing healthy treats over the last few years that I dont feel the need to eat unhealthy rubbish that often - why eat an unhealthy brownie when you can eat a healthy brownie that tastes better!

Having said that, I am the first to admit I am only human and not perfect (hence why theres no washboard 6-pack on this girl!) and sometimes you just feel like eating something rubbishy! There is nothing wrong with it! Life gets in the way of our training and eating plans and beating ourselves up about is just pointless - and also unhealthy. I believe that it encourages feelings of guilt and ultimately, a distorted view of eating for balance and health.

Dont get me wrong I am not advocating eating junk food in large amounts regularly as it isnt good for our bodies. I am a self-admitted sugar binger and over the last couple of years have had to work hard at changing my eating habits and identifying why I do this and how to change this pattern. Its not been easy and I have fallen off the wagon heaps of times - and will probably still continue occasionally!

And that my friends is why I dont plan cheat meals anymore. For the first 2 years of my fitness journey I used to always plan my weekly eating habits around the infamous 'cheat meal'. This was a great reward after a good week of intensive exercise and healthy eating however, when there was a birthday or special occasion or something where I wanted to enjoy a piece of cake or a scoop of ice-cream that did not fit in with my planned cheat meal - I would stress out and feel guilty! Guilty that I had failed at sticking to my goals for healthy eating and guilty that I enjoyed it! This should not be the case - especially not for someone that was doing it right 90% of the time.


If you are working hard and are commited to eating right and making the right choices, there shouldnt be any feelings of guilt or disappointment in yourself when you decide on the occasion to indulge a little. Now this might be a little more difficult for those of you just beginning your healthy journeys and you will have to resist the temptations that occur on a daily basis, but I promise over time things will get easier for you - especially when you start to notice changes in your body, mind and energy levels.

So about a year ago,  I packed in the whole 'cheat meal' concept as I was finding it impossible to schedule when every week I would have this ellusive treat. Instead I commited to eating healthy and taking pride in choosing healthy options and making positive changes. That way when there is the odd special occasion or one of those days where chocolate or pizza is just necessary I go ahead - and the world doesnt end! I enjoy it and then I wake up the next morning to a healthy breakfast without so much as an after thought of my little treat the night before! Ridding myself of this guilt and stress has actually overall significantly killed my desire for junk-food blow-outs. That is because if you tell yourself 'I will never eat a cookie again' automatically cookies will be all you can thing about! We are not designed to live lives of restriction!

Rewarding myself for achieving my health and fitness goals with junk food, also started an unhealthy association that lead me to think 'I've earned this'. Which is fine, but our brains are adaptive little (or big) things that over time will learn that when you achieve something good to make you crave or justify unhealthy food choices. Now I know some people have the willpower of steel and I also know that I am not one of those people! Over time anything that happened in my life that had cause for celebration, I associated with ice-cream, chocolate or take-away binges - 'I'm celebrating', 'I have earned it' - overall I had built this association up in myself that was actually encouraging me to have blow-outs because I felt that I had earned them. I dont personally think this is a good habit to develop as instead of having a piece of cake or ice-cream we will end up eating the whole thing! Not good for our livers! Indulging should be a joyful occasion where we eat enough and stop when we are full - not excessively cramming in as much sugary tasteyness that we can fit in before the feelings of guilt and negative self-talk begin!

So in short - cheat meals are a little too inflexabile for my liking and I personally feel that a reward system in our heads should be built around celebrating the occasion or achievement as opposed to associating it with a junk-food binge. Everyone is different and life is alway unpredictable so be kinder to yourself  and enjoy the learning curve!


Mary xxx


Sunday 26 October 2014

Reading Food Labels + 3 foolproof rules that never fail!

So lately I have had this obsession with swapping my regular milk for coconut milk. I found this super tasty brand called CoCo Quench. I have an obsession with all things coconutty and so when I spotted this carton of tasteyness on the supermarket shelf I couldnt help myself but buy it! And I wasnt disappointed as it is creamy and smooth with a hint of coconut goodness! Since then I have been adding it to my coffee and into my smoothies and swapped it in with my homemade granola in the mornings.I love love LOVED it....


Until...

One morning last week, I happened to randomly skim over the ingredient list and to my dissapointment noticed that it contained sunflower oil. I was shocked! But only at myself because I had been using this product for about 6 weeks and it never once occured to me to read the label! Which is normally an absolute golden rule of mine when it comes to eating right and fueling my body properly. It just goes to show how important it is for us to learn how to read labels correctly.

Dont get me wrong, I am not bashing this product in the slightest (its so damn tasty!) but consuming sunflower oil or any sort of polyunsaturated fatty acid (PUFA) is something that I try to avoid as much as possible. PUFA's have been proven in recent years to be toxic for our bodies and promote inflammation and sickness. I could go into great detail on this topic and be writing for days about it so I will keep it short and sweet! If you are interested in learning more about this subject have a look at some interesting articles that I found online that explain the concernes with PUFA's well.

Here is an intersting article that I found on Paleoleap.com
The many dangers of excess PUFA  consumption

Also its worth having a look at the website of David Gillespie, who is the author of 'Toxic Oil - Why vegetable oil will kill you and how to save yourself' Toxic Oil by David Gillespie


Now lets close that can of worms and get back to my reason for posting today! (Sorry I go off on a tangent ALOT! - I like to believe it is because I have so many interesting things, but that may be denial...!). When I started eating right and taking care of myself one of the biggest game changers for me was reading labels. It is the easiest way to figure out whether or not you should put an item in your trolley. Knowledge is power and knowing what chemicals, additives and nastiness you should avoid is the best weapon out there to arm yourself with in this world of false advertising and misrepresentation.

Ideally we should all be staying away from anything that comes out of a package or box. But in our modern society and culture that is just not a practical approach to take! Choosing foods that are as minimally processed is one of the best approaches to take as it eliminates options with a huge ingredient list!

Some simple tips that I use are:

  1.  Look for sugar content


Yes this is VERY important, items on cans and packages are listed according to weight which means the stuff used the most in this product is the first on the list. Therefore if sugar is listed in the top 3 ingredients, avoid this product as a large percentage of it is made up of sugar.

Yes the refined white stuff is a hugely important thing to avoid but also hidden forms such as high fructose corn syrup, concentrated fruit juices or syrups (I found a good list of other sugary ingredients to avoid here. This also goes for 'healthy' forms aswell, yes there is much less processing in honey compared to golden syrup but it doesnt mean we should eat a bucket load of it a day! The body still recognizes it as sugar so therefore it is sugar! We should save the sweet stuff for the occasional treat and otherwise keep it to a minimum!

Tip: check the nutrtition information and if there is over 5 grams of sugar per 100g then stay away from it as it will significantly increase your sugar intake without you even realising!


      2.  Dont buy into the hype!

Just because a product claims it is 'Natural' or 'Organic' or 'Healthy', doesnt mean that is the case. Food companies will use just about any kind of false pretence to convince you that buying their product is the best choice you will make. Make the decision for yourself by reading the ingredient list and identifying if there is any hidden nasties within.

Avoid 'lite' and 'low-fat' products like the plague! Try to remember that most of the time the flavour of food is removed by extracting the fat content, therefore these companies have to replace what they take out with far worse ingredients such as sugar, fillers and additives in order to get that taste back.

Tip: if you can't pronounce it, then you probably shouldn't be eating it!


      3.  Make decisions for yourself

This is an important one because it reguires us to be really REALLY honest with ourselves. Food marketing and advertising strategists really know how to get under our skin and convince us that their products are the healthiest on the market and that our lives will not be complete unless we are buying them. You need to constantly ask yourself, is this the right choice for me? is this really healthy?

Have a think about that fancy meal replacement bar that your favourite celebrity is endorsing. Yes she looks amazing and she claims it is all down to this energy bar, therefore if we buy the same product we will also achieve this. WRONG!! Ask yourself, how much money does she make from endorsing these products? Is buying this one product really the answer to all our unhealthy habits? Then have a look at the ingredients list, if there is a list of about 30 ingredients that you cannot pronounce including additives and chemicals then refer back to rule number 2 above and AVOID!!

Remember: this is an important rule as it is something that we can fall vulneralbe to no matter what stage we are at with our healthy eating and willpower.


The coconut milk that I spoke about at the start of this post is a perfect example of this! I actually read an endorsing post about this particular brand on a website that I follow regularly and generally regard their nutrition advice to be solid and trustworthy. I believe that is the main reason why I picked this product up without even so much as a glance at the ingredient list. After all 'Website X' says its is healthy so therefore it must be right?! I think this incident was a really important learning lesson for me to remind myself that I still have alot to learn and need to keep my eye on what is going into my body!

I just want to say also that I am not using this post as a negative review, I am using it as an example. I identified an ingredient within it that did not fit in with my personal healthy eating philosophy as an individual.

Here is another great article that I sourced from the 180 nutrition website written by a qualified nutritionist, you can read it here.

So to recap, read your labels! Once you learn something is bad for you, you cant then un-learn it. Reading labes and making informed choices on the things we buy and eat is the first and most effective step in creating a happier more healthy lifestyle and body!

If any of you like me have made any slip-ups when it comes to reading labels please share in the comments below. Also if anybody has any recommendations for coconut milk I would be forever grateful!! Thanks!


Mary xxx


Monday 20 October 2014

Workout Inspiration - The secret to toned arms!

Yes ladies!

The infamous upper arms! Tightening up the back of the arms seems to be a real stubborn spot for alot of women out there.

Answer me this, do you lift weights at the gym but still feel that your arm definition is lacking? would you like that sexy cut in the back of your arms to boost your confidence in a tank top? are you unsure of how to achieve this?

Well! Look no further as I have the answer that you are searching for! You have got to work your triceps! Your tricep muscle is that little hidden muscle at the back of your arm that is likely looking for some extra attention - an area that is also a common fat-storage spot in us ladies (Damn it!!!).

Aside from wanting to look good, the triceps also play an important part in our functional upper body and arm strength. In order to make overall improvements with your strength, it is vital that balance is achieved between biceps and triceps - both the front and back of the arms to prevent muscle imbalance and injury.

So that brings me to todays workout inspiration post! I have drawn up a quick triceps circuit that you can try. Do 1 round of this back to back, take a minute rest and then repeat.


1. Tricep Push-Ups

  • First get into a standard push-up position - arms directly under shoulders with your body aligned in a plank position. (Tip: focusing your eyes on the floor slightly in front of you will keep your neck in a neutral position and prevent any injurys).
  • From here bring your hands closer together so that your elbows are tight against your sides. (Tip: for added wrist comfort, rotate your wrists outward slighty for more comfort)
  • Breath in and slowly lower your chest towards the floor. Your elbows should bend backwards as you lower down - ask yourself  'are my elbows grazing my ribcage?' if the answer is no then your hands may still be too wide.
  • Breath out and push through your hands, pressing your body back up to the starting position.
You can modify this easily by going down to your knees instead of your toes, or by doing an incline version with your hands placed flat on a level weight bench or sturdy chair to incline your body and take pressure of your wrists 


2. Tricep Hover
  • Align yourself into the tricep push-up position.
  •  Breath in and bend your elbows backwards and lower your chest slowly and stop just a few inches above the floor. 
  • Make sure your core is engaged. Stay here for 30 seconds. 
You may need to go to your knees as you start to fatigue or start this exercise from the modified push up position as above in order to build up you strength and progress to the more advanced position.


3. Dumbell Tricep Extension
  • Stand up with your feet shoulder width apart and your core engagedur , holding a dumbell with both hands.
  • Slowly raise the weight over your head with both arms straight (extended arms). This is your starting position.
  • Breath in and bend your elbows, slowly lowering the dumbell behind your head. Your elbows should be held close to your head and only your forearms should move.
  • Breath out and slowly raise the weight back up to the starting position.
 4. Dumbell Tricep Kickback 
  • Hold a dumbell in one hand and stand with the opposite leg leg slightly forward in a split stance.
  • Slightly bend your knees and lean your chest forward, hinging at the waist, keep your back flat.
  •  Your elbow should be in a bent position against the side of your ribcage.
  •  Breath out and slowly try to straighten your arm pushing the dumbell back behind you. 
  • Breath in and slowly lower the forearm down again. Tip: again as in no.3 your elbow should remain fixed and only your forearm should move. Repeat holding dumbell on opposite side.

5. Tricep Dips 
  • Start by sitting on a level weight bench or sturdy chair. Place your hands by your sides about shoulder width apart.
  • With your arms straight, slide your bum off the edge of the bench. 
    • There are 3 difficulty variations:
    • Advanced: legs extended straight in front of you with weight on your heels.
    • Intermediate: knees bent with one leg crossed over the other.
    • Beginner: knees bent with both feet resting on the floor - choose your variation
    • Remember! the further your feet are positioned from your bum the more difficult this becomes.
  • Once you have chose your difficulty level position yourself properly, then breath in and bend your elbows, lowering your body towards the floor until your elbows are at a 90 degree angle.
  • Breath out and slowly push your weight into your hands, straightening your arms back up to the starting position - keeps a slight bend in the elbow to take any excess pressure of your elbows and wrists.
 Note! This is an important angle to achieve as it is the best for working the tricep, if you struggle to lower to 90 degrees - consider modifying with knees bent and feet closer to bum until you can achieve full range of motion - sometimes its better the master the basics before diving into advanced!


Final Note: remember to chose a weight that is heavy enough to challenge your strength, but not so heavy that your form suffers - core should be activate and spine should be straight throughout. You want to aim to master good form and posture in order to reap the optimum benefits of these kinds of exercises. 

And there you go! A good killer tricep workout that challenges the triceps from all angles! Enjoy the burn ladies, I know I did! 

Mary xxx 

Thursday 16 October 2014

180 Natural Protein Superfood Review & Smoothie Idea!


 When I started out on my health and fitness journey, there was a lot that I didn’t know… I mean A LOT!!! I didn’t know anything about portion size or caloric intake or how many meals I should be eating. What made it harder was that any time I tried to do some detective work on these topics I was met with a huge variety of conflicting opinions. Do this, do that, eat this, don’t eat that – how is anyone supposed to feel confident in making the right choices!!

What I have learned in the last couple of years is to not obsess over these kinds of issues as you will want to pull your hair out! There are so many right and wrong ways of eating healthy that you could give years trying to figure out what is considered the best way and lose sight of what is right for you! I personally believe that by just eating real food (#JERF – yes there is a hash tag for it!) we eliminate a lot of these burning questions and conflicting opinions. By eating foods in their most natural and whole form we cut out all the crap such as highly refined processed carbohydrates and sugary foods. 

This brings me to the subject of my post today. One of the first things that I did when I decided to clean up my diet was invest in a variety of protein powder products. I found these great at the time as they were quick and easy to make and carry around. With my goal being to eat as natural and minimally processed foods, I had my suspicions about the nutrient value of these powders. On further research I was disappointed to realise that the majority of conventional powders are highly processed using extraction methods under high heat with a lot of preservatives, chemicals and added artificial sweeteners of less desirable nature thrown into the mix.

This inspired me to do a bit more homework on the subject and begin a search for any available protein powders on the mark that contained as little crap as possible. I stumbled across 180 Nutrition’s Grass-Fed Whey Protein Powder, a 100% natural product free from preservatives and chemical. It is gluten and sugar free and backed by nutritionists and naturopaths. Founded in 2010 by health & fitness duo Guy Lawrence and Stuart Cooke who identified the need for a more natural post-work out supplement that cut out all the rubbish and unnatural fillers contained in a large proportion of mainstream conventional supplements.

What makes 180 Protein Superfood Powder unique is its all-natural content containing nothing but:
·         Grass Fed Whey Protein Isolate (or Pea Protein Isolate for the vegan version)

  • Flaxseed 
  •  Almond Meal
  • Sunflower Kernels
  • Coconut Flour
  • Cocoa Powder (Raw)
  • Chia Seeds
  • Pumpkin Seeds (Pepitas)
  •  Sesame Seeds
  • Psyllium Husks
  • Inactive Brewer’s Yeast
  •  Stevia (all natural herbal sweetener)

Here is a very interesting picture referenced from the 180 Nutrition website comparing an average protein powder to 180 Protein Superfood.
180 Natural Protein Superfood
Brand X (Current Top Seller)
Grass Fed Whey Protein Isolate
Whey Protein Isolate
Flaxseed
Whey Protein Concentrate
Almond Meal
Calcium Caseinate
Sunflower Kernels
Micellar Casein
Coconut flour/shredded coconut
Milk Protein Isolate
Cocoa (Chocolate flavour only)
Egg Albumen
Pepita (Pumpkin seeds)
Glutamine Peptides
Sesame Seeds
Sunflower Oil
Chia Seeds
Corn Syrup Solids
Psyllium Husks
Sodium Caseinate
Inactive Brewers Yeast
Mono- & Di-Glycerides
Stevia
Di-Potassium Phosphate

Tricalcium Phosphate

Lecithin

Tocopherols

Natural & Artificial Flavors

Polydextrose

Cellulose Gum

Medium Chain Triglycerides

Non-Fat Dry Milk

Disodium Phosphate

Silicon Dioxide

Processed Cocoa Powder

Sucralose

Acesulfame Potassium

Papain

Bromelain

Shocking isn’t it!! I can’t even pronounce half the stuff in the left column. Ever hear of the saying ‘never eat anything that you can’t pronounce’??  It’s an eye-opener!

More information is available here at: http://180nutrition.com.au/compare/


Here are my overall thoughts:


Product Range:
There are 2 types of powders available – Whey Protein Isolate and Vegan Pea-Protein Isolate. Flavours available include chocolate and coconut, which is another thing that sparked my interest as I am slightly (FULLY) obsessed with anything coconut-y!


Flavour:
I ordered the Coconut WPI and was nicely surprised with the flavour – not a very strong in-your-face coconut hit. In my opinion this isn’t a bad thing, it brought a nice wholesome subtle hint to my smoothies without the sickly sweet artificial flavours of some brands. I also think this is a bonus as it allows for some flexibility in what you chose to use the supplement for – there are some yummy looking protein muffins and wraps both sweet and savoury that incorporate the coconut powder available on the 180 website. I therefore think this is the more functional flavoured supplement compared to the chocolate flavour if you are looking for more options with regards to you supplement intake.
For those of you who would prefer a stronger flavour it is important to remember that this supplement is free from unhealthy preservatives and artificial flavours and sweeteners. Try to remember that it is not supposed to taste like mainstream supplements so it may be a slight adjustment if you are used to highly flavoured products.


Texture:
This is an interesting subject as the texture of 180 Natural Protein Superfood differs greatly from conventional protein powders. It has a grainier texture given that some of the seeds within are left whole or roughly ground. This is not something that is going to suit everybody given that is not the most mixable product – it is delicious in blended smoothies with milk/water and some added fruit for balance but may not be the best choice for those who prefer a quick hand-made shake.


Cost:
180 Natural Protein Superfood is a very cost effective given that it retails at a similar price to mainstream products despite its ingredients being based on high-cost natural sources. A 1.5kg bag retails at $69.95 and a larger bulk bag at $179.95 for 4,5kg – which is probably the better buy for your wallet, once you have already tried and tested it and committed to a flavour that you like. Samples and starter packs are available to ‘try before you buy’.


Where to buy:
180 Nutrition is available at certain stockists (lists available on their website) in Australia and New Zealand but the best place to buy from is online directly from their website as I personally thought the service was quick, efficient and seamless. It is easy to see that this is a company that cares about their product and their customers.
 

Overall, I feel that this is a great product. I know that the principle of trying to eat food in its most natural form can be contradictory to the idea of consuming protein powders. But I personally feel that all natural protein supplements can be a nice addition to a clean and healthy diet adding some variety and flavour additions in moderation. Remember that this blog and my philosophy are all about not focusing too much on perfection! I use 180 Natural Protein Superfood as a post-workout shake, in a breakfast smoothie to up the nutrition density profile or as a healthy treat to satiate sweet cravings.  


Smoothie Idea!!
My favourite way of using 180 Natural Protein Superfood Powder is in a Coconut & Blueberry Smoothie:

Ingredients:     - 1 Cup of Coconut Milk/Almond Milk/Full fat Milk

-½ Cup of Frozen Blueberries

-1 heaped scoop of 180 Natural Protein Superfood Powder Coconut (WPI or Vegan – you could also use chocolate for a different variation)

(Tip: if your extra hungry include a tbsp or 2 of coconut oil or nut butter – avocado also works well for creaminess)


Simply whack all the ingredients in a blender and whizz on high for 30 seconds and enjoy! You can top with cinnamon, extra berries, coconut flakes or cacao nibs to make it pretty if you want!


It is a great product and I have been thoroughly enjoying making my way through my first bag of Coconut. It will not be my last and I am looking forward to trying the chocolate also!


Give it a go and see what you think!


Mary xxx